Friday, June 29, 2012

Angels over the ocean


Blue Angels fly in formation as a group of seaside bathers, swimmers and surfers gaze up in wonderment at the pilot's aeronautical maneuvers .  I captured this moment in time from a friends dune deck on a gorgeous day in June when the Blue Angels, the United States Navy's flight demonstration and formal flying aerobatic team, were in town for a Patriotic Festival. 

Part of my Coastal Color Collection.
Enjoy Summer!

Thursday, June 28, 2012

Enjoy Summer

On my walk yesterday afternoon I decided to take a detour off of the boardwalk.  I was curious to see what our town might look like through the eyes of a tourist.  So, with i-phone camera in hand, I headed down the strip - past souvenir shops, ice cream parlors, restaurants, bars and drug stores.

I had one of those double-take, "You've got to be kidding me" moments when I saw these two signs hanging in the window of a souvenir shop. Really?  Beer, wine, food, coca-cola - are these seriously the ingredients to an enjoyable summer?!  As I continued my walk I knew I had to amend this discrepancy with my own little take on the subject.

BIKE, SURF, WALK, DRINK
I think these four words more adequately describe how one might truly enjoy summer .
Be healthy, be active, have fun.

Coastal Color

A new collection of vibrant images captured around my colorful town.
8x10 inch print

A walk along the boardwalk provides so much color in the form of people and objects, especially during summertime.  With the beach a 5 minute bike ride from my house this brilliant expanse of color is a view I am lucky enough to see on a daily basis.  Knowing others are not so fortunate, I thought it would be nice to share pieces of my multicolored town.  So I kick off my coastal color collection.

I hope you enjoy this perspective of "my" beach.

The collection will also be available in my MagicMarkingsArt shop.

Tuesday, June 26, 2012

Summer Art Camp

Week Four - Ages 6-8
Hawaiian Luau
A visit to the tropical Island of Hawaii gets us in the mood for a week of creative fun with a little learning thrown in for good measure.
 PROJECT ONE
Handmade Pottery Plates
Working with a slab of low fire clay, the artists task was to create a plate accented with tropical sea life.  Step One:  Roll out a slab of clay to a pretty even thickness.  Step 2:  Trace around a paper plate, cutting through the clay, to create a circular form. Step 3 and 4:  Cut out clay shapes with cookie cutters, score the back with a fork and add wet clay or slip over the scored sections.
Place all cookie cutter shapes onto the plate and, with wet fingers, gently smoosh the edges together to help adhere them to the plate.  Set the plates aside to dry then fire to a bisque consistency in the kiln.
 BE VERY SURE THE CLAY IN NOT TOO THICK AND HAS ENOUGH TIME TO DRY...
Otherwise, after firing the pieces you will open the kiln to a very disappointing scene - which is exactly what happened with our fabulous plates!  Such a sad situation indeed!!
 Back up Plan:
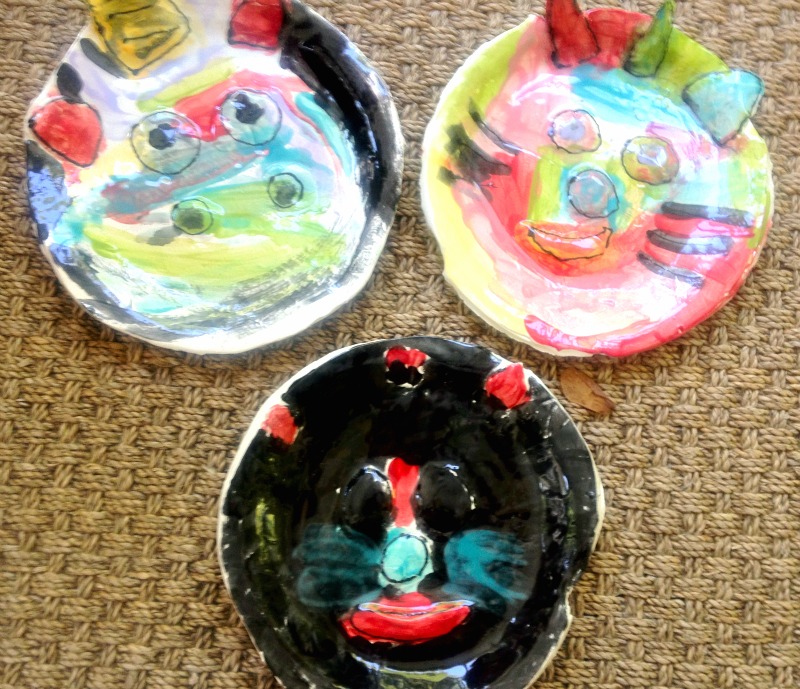
Fortunately the artists were still able to create a tropical plate by using bisque pottery plates I had on hand.  The artists drew a scene onto their plates and painted them with non-toxic glazes.  A few of the artists attached their sea life shapes that had survived the kiln disaster.
FINISHED PAINTED POTTERY PLATES.

PROJECT TWO
Stuffed Fish
Our next project was to draw a fish onto a 14x17 inch sheet of multi-media paper - making sure to use the whole sheet of paper to create a large fish shape.  Since we were going to add dimension to the fish, we cut through an extra sheet of paper when cutting out the fish shape.
Finished Project
Stuffed fish on a fishing pole.
The artists outlined their fish and details with a black sharpie.
Painted the fish with water color paint.
Glued the two fish shapes together, leaving an opening at the head.
Stuffed the fish with newspaper, glued the end shut and attached a piece of twine to the fish and a wooden dowel.
PROJECT THREE
I love the vibrant colors and patterns of Romero Britto's Pop Art Paintings.  His work is a perfect example of how the elements and principles of art all work together to create a wonderful composition.
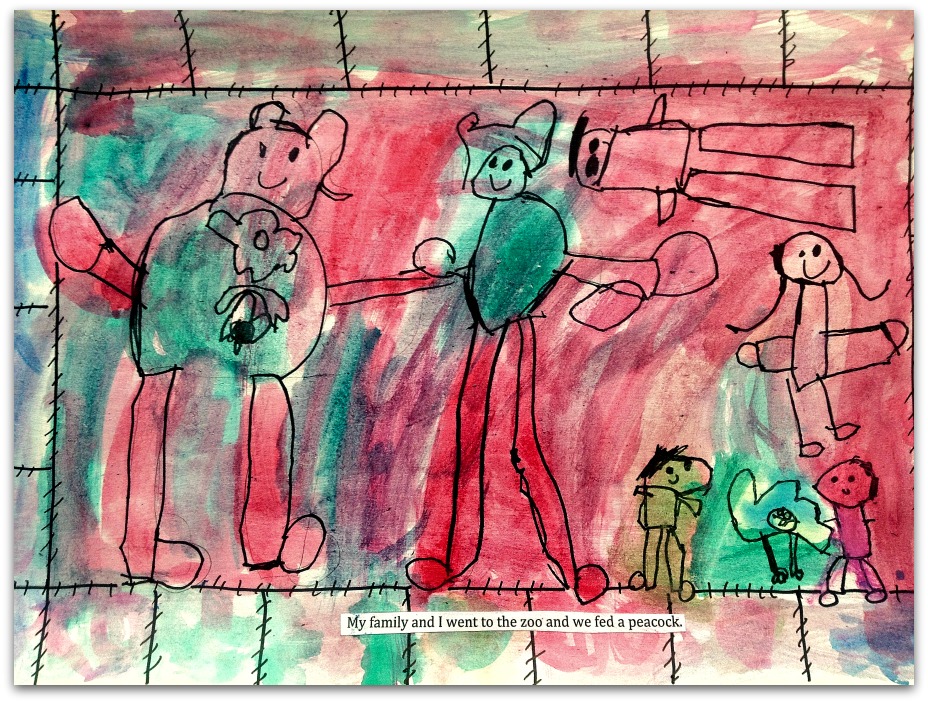
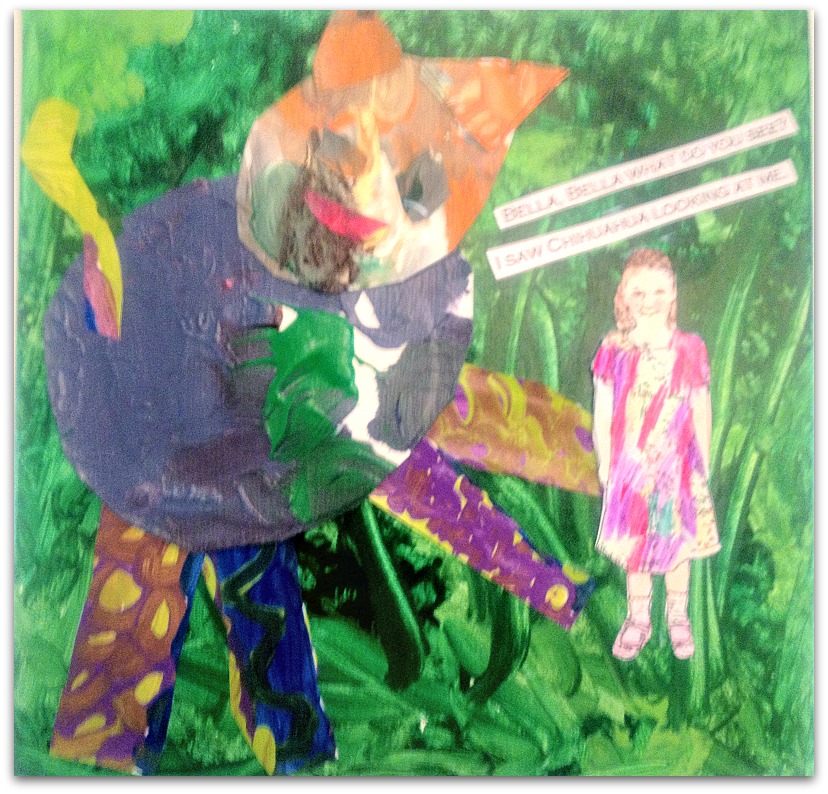
We looked at Britto's art work and discussed his use of shape, line, color, and texture within each piece of art.
Using what they learned about the elements of art, the artists drew a tropical scene onto a 16x20 inch canvas.
They outlined their drawings with thick black sharpie and painted in their tropical scene with acrylic paint.
When painting their work the artists had to think about pattern and color balance throughout their composition.
 A lovely example the use of shape, line, pattern, movement, and proportion in a work of art.
LAST DAY SNACK
Cupcakes

 A group of hard working artists are rewarded with cupcakes - handmade by them!  Congratulations on your fabulous week of art!  ALOHA

Monday, June 25, 2012

Monday morning


Do you get the feeling that, for a cat, every day is like summer vacation?  A little breakfast, a nap in the sun...no shoes, no work, no problems!

Wednesday, June 20, 2012

Summer Art Camp

Week Three
Family Stories
For week three of pre-school art camp we created works of art based around the motif of family - the perfect theme for a group of young artists still in their early stages of creative development and for whom families are of deep importance. 
Project One
Clay Pottery Portraits
Once again we began the week by playing with clay which provides the young artists with an opportunity to investigate how this particular media feels and works.  Step one was to place a simple face shape on a slab of clay and cut the shape out by tracing around it and through the clay with a pencil.
The artists smoothed the edges of their clay faces then created facial features and hair with clay shapes which were placed on the face and smooshed down with wet fingers.
The faces were set aside to dry then fired in my kiln.  During our second class the artists drew facial details onto the bisque ware with pencil.
The bisque faces and hair were painted with colorful, non-toxic pottery glazes.  Which, when finished,
were carefully placed in my kiln, checked and double checked to make sure all were still smiling, all systems were declared go and the kiln was turned on for the last firing process.
The artists handmade and painted pottery faces fresh out of the kiln, still smiling, and ready for the art show.

Project Two
Faith Ringgold Family Quilts

Project 2 started off with the reading of and discussion about Faith Ringgold's storybook "Tar Beach"  Faith Ringgold is an artist best known for her painted story quilts - art that combines painting, quilted fabric and storytelling.  The perfect artist for this age group with their love of make believe and storytelling.

Since the theme of this camp was all about family, the girls imagined themselves and their families doing some sort of a family activity.
They sketched their family activity portraits into the center of a 12x18 inch sheet of watercolor paper.


A pattern of squares was added around the edges for a Faith Ringgold like "quilted border".  Once the pencil drawing was finished, the girls traced around their lines with a fine point black sharpie.
The artists painted over the entire sheet of paper with a coating of water to help the paint flow and the colors mix.
Before the painting process began, we talked about the proper way to use water colors.  The girls learned how to pick up paint by swiping their wet brush across the individual paint colors.  This process picks up just the right amount of paint and is much better than jamming and twirling a brush into the colors.
As the girls were painting they each told a little story about their family portrait.  The stories were typed onto a sheet of paper, cut and "sewn" onto the quilt with Mod Podge.


The Finished Story Quilts

My Family and I play outside together.
My whole family is having fun going to a restaurant.
My brothers like to play with cars.  My dad works with electrical.  I like to play with my brothers, sometimes they let me play with them.  My mom likes to cook because she has to.
My family and I are playing outside in the sunset.
My brothers and I went to school and we had lunch.  Now my family is going to play tennis.
My family and I went to the zoo and we fed a peacock.
Project three
Wood Block Houses

For our last project the artists designed their family home using two pre-cut wood blocks.
Windows, doors, flowers, trees and chimneys were drawn and outlined.
The artists painted their architectural designs with acrylic paint.
The houses were set aside to dry while we headed into the kitchen for...
Cupcake Time!!


Where everyone takes part in the adding, breaking, measuring, pouring and mixing of the batter.
It always seems to take forever for the cupcakes to bake and cool off before they can be frosted, decorated and...

Eaten - Yum!

Another group of happy artists on their last day of summer art camp.

Monday, June 18, 2012

Summer Sunset

My husband and I have been taking advantage of having both of our children home before my son makes his big move down to Charleston, S.C. for real life after college.  One of our families long time favorite activities is an end of the day bike ride along the boardwalk.  As the four of us rode down the beach last week I caught this shot of the sun setting behind one of our local amusement parks.   With our son heading south later this week, I felt this image appropriately captured my husband and my need to fill our gloaming days together with as much family activity as possible.  Although I'm super sad to have him seven hours away, I'm beyond thrilled to have another excuse to visit one of my favorite cities!  Roadtrip anyone?!

Thursday, June 14, 2012

Summer Art Camp

Week Two
Animal Love

Week two of pre-school summer art camp was centered around our love for animals, both the domestic and wild variety.  Before embarking on our projects the little artists and I talked about our family pets which included dogs, cats, fish, turtles and caterpillars - a very interesting conversation indeed!  After a few good stories the artists were ready to get to work.

Project 1
Handmade Pottery Animal Faces

We always start off art camp by hand building a shape from a slab of clay.  This gives the clay creations time to dry before they are fired in my kiln.  For our animal camp theme the girls created pottery animal faces.   The multi-step process began by placing a paper plate onto a cut slab of clay, tracing around the plate with a pencil, taking away the extra clay, placing their round clay shape on top of the paper plate and carefully pressing the clay into the plate with a wet sponge.  The clay plate form was set aside while the girls cut eyes, ears, a nose and mouth out of their extra clay.   These shapes were placed onto the the clay plate, and, with wet fingers, the girls smooshed and sealed the edges together. 

The clay forms were given time to dry then fired in my kiln to a bisque consistency which makes them perfect for painting and glazing.   On the second day of art camp, the girls gave their bisque animal faces color and expression with non-toxic pottery glazes and signed the back.  An overcoat of clear glaze was applied and....

the clay shapes were carefully placed into my kiln for one last firing.

Three very proud artists showing off their finished and very colorful pottery animal face plates.   Notice the bowl of water on the porch floor- just incase the very thirsty handmade animals needed a drink.

Project 2
Watercolor Animals

For this project we used Canson's 140lb cold press water color paper which has a wonderful surface texture that erases well and blends easily.  The artists first step was to draw a large scale animal composition making use of the whole sheet of paper with as little negative space left as possible.


The animals were outlined with a Reeves black oil pastel - perfect for resisting the watercolor paints that would be applied later.

Before the girls started painting their animals we applied a thin coat of water over the whole sheet of paper.  This wet-on-wet process helps the paint flow and produces beautiful blended colors.  The girls were able to paint right over their lines without smudging them due to the nature of oil and water resisting one another.

The Finished Paintings
 Two black pigs dancing on a summer evening.
A happy dog chases a colorful blue spider.
A leopard lounging in a cool blue pool.

Project 3
Eric Carle Animal Collages
Our last project was based on Eric Carle's Brown Bear, Brown Bear storybook.  I read the story to the artists and we talked about the colors and textures created for each animal in the book.  Eric Carle's fabulous collage technique, using hand painted papers is easily recognized by book lovers of all ages.

Our first step here was to fill a 12x12 inch canvas with dots of light green, lime green and dark green acrylic paint, all mixed together in a random pattern.  This method of painting gives depth, texture and movement to the background.

While the green canvas paintings dried, the girls produced hand-painted papers which would be cut and layered to produce their Eric Carle like animals.

Creativity and paint flowed as paint was applied to paper.

The Finished Collage Pieces
The colorful pieces of paper were cut into shapes and glued together to create a leopard, a goldfish and a chihuahua.  I took a picture of each girl and made it into a coloring book image on my computer then cut it out for the girls to color.  Once finished, the animals and portraits were glued onto the canvas using Mod Podge for our own little replications of the Brown Bear Story.  


 In the Kitchen
Last day of camp snack...

Thanks girls for another fun and fascinating week of art camp!!