Saturday, June 18, 2011

Tableware for Summer Parties

Surfers Beach Plate Collection
BRAND NEW FOR SUMMER TABLE DECOR, BEACH PARTIES, AND BEACH WEDDINGS

  Surfers Beach Dinner and Salad Plates

A collection of hand drawn and painted surfers road trip dinner and salad plates that I designed for lovers of summer, surfing, and the beach life. Painted in non-toxic, lead-free tropical colors of ocean blue, lime green, lemon yellow and tangerine orange; these whimsical plates will add coastal color and fun to your party or table.

Dinner Plates
These pottery plates measures 10.5 inches round and are hand drawn and hand painted with tropical colors and simple wording.  Click on the images for more information.

  Ocean Blue Dinner Plate
 Lime green Surf Dinner Plate
Tangerine Orange Beach Dinner Plate
 Lemon Yellow Swim Dinner Plate

Salad/Dessert/Appetizer Plates

 Surf Camper Salad Plate shown with Ocean Blue Dinner Plate
 Surf Bus Salad Plate shown with Lime Green Surf Dinner Plate
 Surf Woodie Salad Plate shown with Lemon Yellow Swim Dinner Plate
 Surf Jeep Salad Plate shown with Tangerine Orange Beach Dinner Plate

SURF PARTY IDEAS
Ideas for creating your own surf and beach themed parties can be found by clicking on the following two images.


Happy Summer - Party and Enjoy!

Friday, June 17, 2011

Summer Art Camp Week Three

Surf's Up Baby!

Surfing safari
Take an imaginary trip with us as we create our own little world full of tropical art for surfer girls and boys.  Don't forget your sunscreen, these kids are so talented and bright you're bound to get burned!

DAY ONE
 Designing and Painting a surf board

Before camp began, surfboard shapes were cut out of foam core board.  The mini surfboards were ready for my artists when they arrived on the first day.  We discussed different surfboard design ideas then the artist drew and outlined their own creations.

Bright color was everywhere as the artists added paint to their boards.  Once the surfboards were a top coating of  Modge-Podge was painted on to seal and protect the work.  A small piece of ribbon was hot glued onto the back so the boards can be hung when not in "use".  

DAY TWO
Surfboard Name Plaque
 
 
Our pottery project this week was a surf themed name plaque.  The artists drew and painted a beach scene on a rectangular bisque shape, then painted on wrote their names on a small bisque surfboard.  The two pieces were given a top coating of clear glaze, fired in my kiln, and topped off with a bit of ribbon for hanging.  These turned out so cute, but unfortunately I don't have any pictures.

Surfer Self Portraits

The artists were excited to paint themselves as surfer girls and a surfer boy.  We started by dividing the canvas into thirds.  The bottom third was painted with a combination of yellow and white acrylic for sand, the middle turquoise and light blue for ocean water and the top third light blue and white for sky. 

 Once the paint was dry the artists worked on their portraits.  The figures were broken down into simple shapes - a circle for the head, a rectangle body, rectangles for legs and arms with small circles added for knees, ankles, and elbows.  The artists added hair, facial features, and bathing suits.  All pencil lines were outlined with a black sharpie to make the shapes easier to see when painting.

DAY THREE
 Painting self portraits


The artists painted their canvas with gorgeous, bright colors - giving a tropical flare to their surfing self portraits.

SNACK TIME
Making cupcakes

 While the paintings dried, we headed into the kitchen for one of our favorite activities - snack time!!

 Each artist took part in pouring, cracking, and mixing - then worked on another project while the cupcakes baked.  We finished eating just in time for the arrival of parents, who were so excited to see what their little artists had created during this weeks surfing safari.  All I can say is "Dude, it was awesome - You should have been here!"

Tuesday, June 14, 2011

Summer Art Camp - Week Two

All about Me!

 What could be better than creating works of art centered on you and what you love?  The theme for my second week of summer art camp was "All about Me".  With this theme the artists and I had an opportunity to explore a rather self centered idea.  The young artist talked about themselves and discussed what they most enjoy doing.  These passions were then designed, drawn and painted into each students art work.

PROJECT I

Pottery Portrait Plate
For our first project the artists sketched a portrait of themselves performing a favorite activity.  The room was unusually quiet as each student recreated a favorite past time onto their bisque plate.

The artists painted their portraits with pottery glaze and signed the back.  The plates were fired in my kiln,

and are ready to be filled with favorite treats and fun things to eat!

PROJECT II

Portrait in a mirror.
Our second project was a portrait of the artist seen through a hand held mirror.  
When working with a plain white canvas the first step is to cover the whole canvas with color.  In an art class focused on you, this covering should be your very favorite color, and applied in whatever manner you deem necessary.  Whether that is through painting the background in organized, straight lines, big splotches of color, or with organic and animal shapes.

Once the background was finished, we discussed what a portrait of a person would look like from behind.  Would you see their face?  What would the back of their head look like?  Would it be covered with hair, could you see their ears, what about their neck, and how wide would their shoulders be?

After much dialogue and a wee bit of modeling, the artists drew themselves from behind, adding ears, hair, a neck and wide shoulders.  Off to one one side of the face the artists traced around  their hand and added an arm.  Once the drawing was finished they went over their pencil lines with a black sharpie, just to make the lines easier to see when painting the portrait.

Paint was applied in layers, beginning with the darkest color then gradually dabbing and stroking lighter color on top for texture and highlights.  As the artists painted I took pictures of them.  The images were cut into a circle and glued onto a mirror shape.

The finished portraits of fine artists looking at themselves in a mirror - a reflection of line, color, texture, shape and talent!

SNACK TIME!!

 For snack we headed into the kitchen to create everyone's favorite dessert - cupcakes!  Each artist put on their pretend chef's hat and took part in the creation.  First adding the cupcake mix....

then one, two. three eggs with a little egg shell thrown in for any vitamins and nutrients that might be lurking within...

 a little bit of water and some yogurt to sweeten the batter, mix thoroughly, pour into cupcake tins, cook until done...

and devour with great gusto followed by smiles of a satisfied chef!

PROJECT 111
Photoshop Portraits
The last project involved the artists, a camera, a computer, a little photoshopping, crayons and the artist's imaginations.  First the artists pretended they were participating in an activity they love - ballet, boogie boarding, rollerblading and yoga - then posed in that position.  I took their posed pictures, worked with photoshop to make their portraits look like a coloring book image, cut out the figures - which the artist colored with crayons.  Lastly, the artists drew and colored a background scene and we modge-podged their portraits onto the background.

ART SHOW

 The end of the week art show is always a joy to see as proud parents, grandparents and siblings gather around to view the incredible art created by a talented group of artists.

And the artists walk away knowing a little bit more about art, a little bit more about themselves, and with some awesome portraits created in various mediums. 

Saturday, June 11, 2011

Gift ideas for the surfing dad

 FATHER'S DAY GIFT GUIDE
Father's day is one week away so I thought I'd post some last minute gift ideas.  These handmade items are for all those dads who love the sport of surfing.  Click on the image or on the title for more information or to place an order.

CUFF LINKS
Cuff links are a great gift for Father's day, Weddings, Anniversaries, Graduations or just to have for any special occasion
.
 Surfer cuff links handmade for the man, who when out of his board shorts and dressed for an evening out, wants to show his love of the sport and passion for the water.
1) Longboard surfer  2) Surfer with red board  3) Surfing Couple  4) Father/Son surfers


Custom photo cuff links, handmade from your photo,  for those looking to personalize their gift to dad, husband, son or groom.
1) Your child or children  2) Photo of your guy surfing  3) Man's best friend - his dog  4) Father and son

Thanks for looking - and thanks to all those wonderful father's and father-in-laws out there!

Wednesday, June 8, 2011

Summer Art Camps begin

Week I

This time of the year brings out the sweet sounds of birds tweeting, crickets chirping, and children asking "What's for snack today?".   So begins another round of my summer art camps, filled with artistically inspired young students.

Life is Sweet!
  
This year my summer art camp season got a kick start with the theme "Life is sweet."  The artists had a chance to explore the sweeter side of life as we produced, painted and baked works of art good enough to eat!
1st Project
Designing an apron

First on the agenda:  discussing our favorite sweet things to eat.  A few of the delectable morsels that rolled off our tongues included cakes, cookies, doughnuts, and ice-cream.  The discussion became so intensely sweet, one of the artists finally lost her very wiggly front tooth!

After talking about our favorite treats, the artists got to work designing an apron ~ which will come in handy when either painting or helping out in the kitchen.

The apron designs ranged from chocolate chip cookies and a tall glass of milk, to a bright yellow sun casting its sweet rays down on the earth.

2nd Project
Painting a Cake

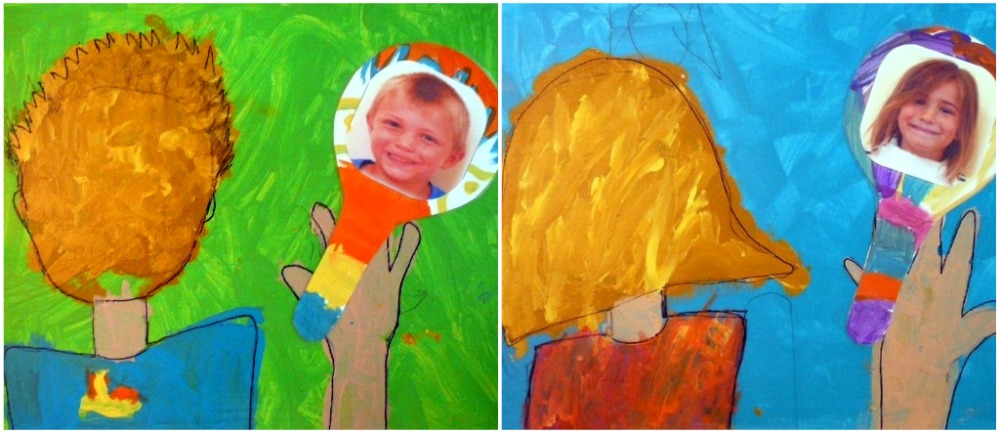
 Since a blank white canvas can be rather boring, and sometimes rather intimidating, the artists painted the entire canvas with their favorite color. With these young artists it was quite amusing to watch how shape filled their canvas before color took over ~

and, as evident from these two images, how each side of the table painted in a distinctly similar fashion. 

SNACK TIME!!!

Giving the painted canvas time to dry, the artists headed into the kitchen for a little brownie making and cooking creativity.  Everyone took part in making the cupcake brownies, from pouring the mix to cracking one egg...

then another, and another until three eggs were staring happily into space waiting for the final steps....

measuring a cup full of yogurt, 1/4 cup of water and mixing the ingredients until everything was combined into one big yummy mess.

Cake Painting Continued...

With the brownies in the oven and the canvas paintings dry, it was time to create our own deliciously colorful cake.  The artists drew a three layered cake, beginning with a large shape on the bottom, a medium shape in the middle, and a small shape on the top.

Then went crazy filling their cake shapes with designs pulled from their imaginations and enhanced by their surroundings.

The shapes were outlined with a black sharpie marker amd painted with vast amounts of acrylic paint.

3rd Project
Making a cupcake stand
Our final project was to make a cupcake stand to showcase the artists delicious cupcake brownies.  The stand required a small terra-cotta pot and lid, that was a little bit bigger, to sit on the top.

The pot sits upside down, so the artists had to take this into consideration when creating their designs.  And, since it wouldn't be prudent, or safe, to paint a cupcake stand with acrylic paint and shellac, the artist painted their pots with lead-free pottery glazes. 

Not only does the top coating of glaze give the cupcake stands a nice gloss finish once fired, it also holds the two pieces securely together.  With a nice full lid, the pots are quite versatile and can be used on a desk, on a bathroom counter, on a dresser or, of course, in the kitchen.

ART SHOW

 During the week I ask my students to keep our projects a secret.  They can tell their parents anything about the camp, except for what they've been creating.  This way they can surprise their parents with their astonishing art work at our end of camp art show.

Wiping brownie crumbs from their mouths, the students explain each project.  Meanwhile parents and grandparents look, with great admiration, on the work created by their talented off-spring.  Later, as I clean paint off of the walls and floor, and reflect on the inspirational gifts these students have given to me and to each other, I can say - with all sincerity - Life is Sweet!!