Showing posts with label student artwork. Show all posts

Wednesday, January 5, 2011

Artist Spotlight - Women who Art

It's been a while since I've shone the spotlight on one of the incredible artists from my Ladies Art Class.  So, to get myself back into gear for the New Year, this week I am featuring two artists.  The first of whom has been with me since the very beginning of my Ladies Morning Out art classes and who I look forward to seeing every week ~ Carolyn Foresta.  The second, an artist who just recently started taking classes and who has already blown us away with her unique style and talent, Gina Foresta ~ yes, they're related ~ Gina is Carolyn's daughter-in-law.

Carolyn

Working with a limited color palette and simple shapes, Carolyn begins painting a Monarch butterfly.
Sometimes, for painting in detail, a lap works better than an easel.
Carolyn adds highlights to the Monarch's wings with various shades of red, yellow, and white

More detail is added to the Monarchs wings , body and to the flower on which it landed.
Carolyn and her finished Monarch masterpiece.  Another stunning painting to add to her walls and portfolio - if her granddaughter doesn't claim it first!!


Gina

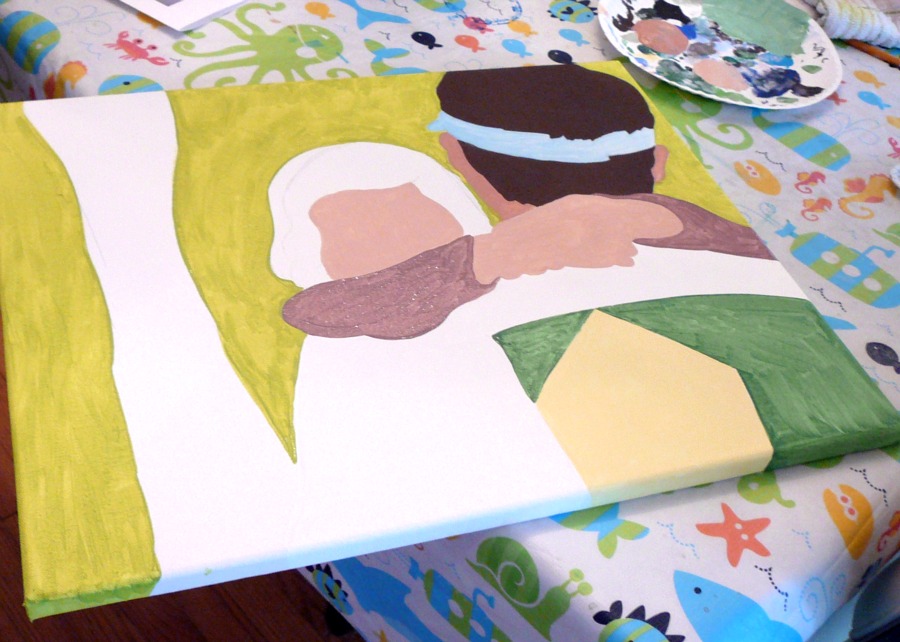
For her first painting with us, Gina chose to recreate an adorable photo of her husband and daughter.  In her pre-mommy life, Gina was a graphic designer. Her design sensibilities and skills shine through in her drawing and painting techniques - which were apparent from the very beginning.
The painting at the end of Gina's first class.

During the next session, Gina added detail to the features and background.
Using the original photograph for guidance, Gina put her own unique spin on the colors and detail.
She played with colors and brush strokes to create a blurry background scene.

Gina contemplates detail in the features of her daughter,
then adds more shading and highlights to the body and background.
Gina and her finished family portrait.  An amazing work of art and a wonderful heirloom painting for her husband and daughter.


Welcome to the New Year.  I look forward to another creative year with my art ladies and to the spotlights which showcase their astonishing talent and art work

Friday, July 2, 2010

Summer Art Camp - Contemporary Art

Summer Art Camp ~  Week Five ~ 
Contemporary Art - Art that has been, and continues to be produced during our life time.  Or, mainly from the 1960's until now.  The art students studied and were inspired by the work of contemporary artists and created works of art based on this theme.

The first artist we studied was Steven Sylvester. A contemporary clay artist whose current work-in-progress is a series of life sized ladies dresses made from clay and wire.

First the artists designed their clothing on paper - with a little inspiration provided by Steven Sylvester and fashion illustrator Katie Rodgers
 Templates drawn, cut and placed on top of rolled out terra-cotta clay.
The artists cut the clay around their template ~ smoothing out rough edges with their fingers and a little bit of water.
 Additional, decorative elements were added to the clay forms.
Then the clay clothing was placed over bottles to dry.
 
The finished pieces ~ fired, painted with acrylic colors and varnished with clear Polyurethane finish.

Our next artistic foray was into Digital Art or Computer Generated Art.  This art form utilizes digital technology in the production of art. 

Transformation of portraits through the help of Picnik's creative posterize program.

The artists colored the back of their printed image with charcoal, flipped the image charcoal side down onto a painted canvas, then outlined each colored section of their portrait with pencil.  Thus transferring their digital portrait onto the canvas.

Images transferred with hand painted backgrounds.  How cool are these?!
 
 Painting in the variations of color.
 
Finished portraits.


Project #3
Printing with a Digital Portrait Image

 A portrait of each child was transformed into a black/white "neon" image
through Picnik's neon program.


The artists placed their b/w portrait on top of a piece of Styrofoam and traced over the white lines with a sharp pencil - transferring the lines onto the Styrofoam sheet.
A thick layer of acrylic paint was painted onto the Styrofoam sheet then pressed onto a piece of white paper.  Presto - A Portrait Print.


And - of course - the end of class "Cupcake Making, Decorating and Eating" Project.


And the proud artists with their art work.
Well Done Art Students - You make an  art teacher proud!! :)

Monday, June 21, 2010

A lesson in Color, Value and Hue

In the next few weeks we will have a visiting artist in my "Women who Art" class.  The artist, Lee Dickerson,  will be teaching color glazing techniques for acrylic on canvas.  In order to have an opportunity to play with this method, the ladies first have to create a gray-scale under-painting.  Below is a little tutorial and step by step guide of their paintings in process.

The ladies decided they wanted to use a conch shell (found here) as their inspiration.

For this project the students will need both a color and black/white print out of the conch shell.

 For each student:
Print out 2 copies of the color image, and 1 copy of both the black/white shell image and the gray scale chart.

Gray scale chart can be found here

Gather all materials needed to create painting:  Canvas paper (9 x 12 inches), black charcoal, pencil, black and white acrylic paint, palette, paper plate for color mixing, brushes, and water container.

Begin the process by applying a layer of charcoal to the back of the colored image

It's quite the messy process - charcoal tends to get everywhere besides the back of the paper.

Flip the charcoal colored copy - charcoal side down - on top of a sheet of canvas paper.

Transfer the image by tracing the shell contour and lines of color gradation.
Gather together the line transfer, black/white shell print, gray scale chart and black and white paints...

and start your painting.  Add a layer of white acrylic - the gray scale of the white is from charcoal dust mixing in with the acrylic paint.

Outline with a thin line of black paint, so you don't loose your contour lines.  Work the black paint into the white to create a gray tone.  It's easier to discern the color gradations by either squinting at the b/w print - or by looking at the print from a distance.

Continue to define the form by gradually adding tiny drops of black paint to the white.   Slowly building up the gradation of values to suggest the shells mass and contour.  The image above are the ladies conch shell paintings in various stages of completion.  We will continue to work on these next week.  

~ Ladies at work ~


Getting ready to transfer image.

The painting process begins,


and continues to develop.

Feel secure ladies...Lee will be very impressed!!!!